

Boss SDE 3000 Delay Review – 80’s Delay makes a return!
Introduction
Where do we start with the Boss SDE 3000D Delay Pedal? If you listened to pop, rock, or metal in the 80s, there’s a good chance you’ve heard the iconic Roland SDE 3000 in action! This legendary rack mount delay unit was used by many guitarists, including Eric Clapton, Steve Lukather, and of course, Eddie Van Halen, who famously used two units in stereo! However, in recent times, the original SDE 3000 has become quite pricey, hard to come by, and difficult to use. So, what’s the solution?
Luckily, Boss has released the SDE 3000D in a convenient pedal format! This allows you to fully immerse yourself in the 80s delay sound, but with added extras and modern features. We’ve had the Boss SDE 3000D in the studio and have been using it extensively over the past few weeks to provide you with an honest and thorough review.
Boss SDE 3000D Delay Pedal
The Boss SDE 3000D is their take on the old Roland SDE rack units from the 80s, used and made famous by several guitar players, mostly Eddie Van Halen. They have taken the sounds and settings from the old rack units, shrunk them down into pedal form, and added some new features for good measure! The SDE 3000D packs a huge amount of features, ranging from tap tempo to a whopping 3000ms delay time!
Control-wise, this pedal has a lot, I mean a lot of controls! So we will give you a quick rundown and break it up into sections so it is easier to understand. We have split it up into three sections: switches, buttons, and inputs and outputs. This will hopefully make understanding the layout of this pedal a lot easier!
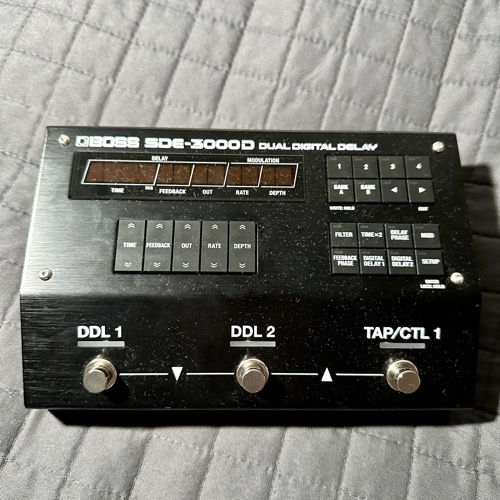
Foot Switches
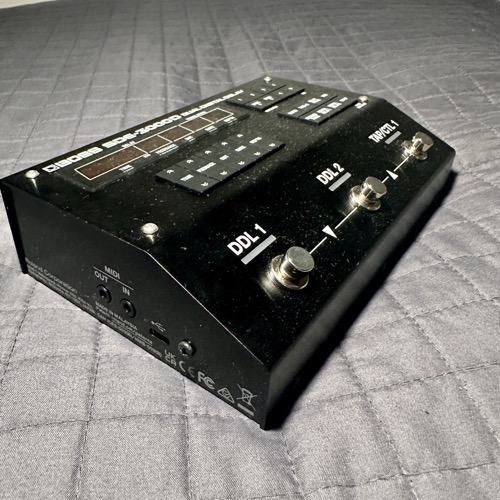
The Boss SDE 3000D only has 3 foot switches, but with those 3 switches, you can do an awful lot with this pedal! Starting from the far left, you have the “DL1” foot switch. This turns Delay Line 1 on and off. Next to that, you have the “DL2” foot switch, which does the same for the second delay line.
Finally, we have the “Tap/Ctrl 1” switch. This is used to control the tap tempo; however, using the “Ctrl 1” options in the settings, you can set it up to do various things! From tap tempo to only controlling tap tempo for one or the other delay lines, making it so the delay is only audible while you hold the button down, there are so many options you can control using this button.
Front Panel Buttons
Let us start from the far left again, the first control we have is the “Time” control. This sets the delay time for the chosen delay line (default is milliseconds). You can press up to increase and, likewise, down to decrease. Next is “Feedback”, which sets how long the repeat goes on for, or how many repeats you have. After feedback, we have “Out”, which controls the level of the delay, determining how loud the repeats are.
The next two controls are for the modulation section of the delay. First is “Rate”, which controls the cycle of the modulation, or how fast it modulates, and then you can use the “Depth” control to set how deep the modulation goes (setting it to zero turns the modulation off).
If we take a look at the top right, you have a bank of buttons. Along the top row are the numbers 1 to 4, allowing you to select the presets within the bank. The next row down on the left has the buttons “Bank A” and “Bank B”. These are the default banks; pressing one of these, then the number above, will take you to that preset. The two arrows are to swap between the displays. By default, the display will show the delay parameters; however, using these arrows, you can adjust the display to show different info (bank number or BPM information).
More on the Front Panel
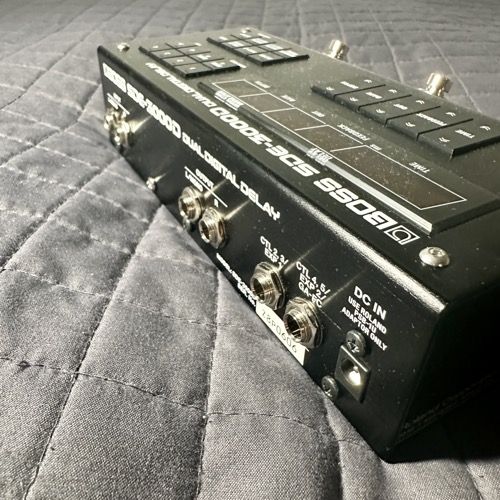
Below this bank of buttons, we have the final bank of buttons. These contain the setup and control buttons and some buttons to quickly change delay options. From the top right, we have a filter button, which applies a filter (users can alter the filter options) to affect the repeats. Next, we have a “Time X2” button, which will either double or half the delay time (depending on what the delay time is set to), allowing you to quickly double or halve a delay.
We then have a delay phase button, which inverts the phase of the delay, and a modulation button, which turns the modulation on or off for the chosen delay line. A feedback phase button inverts the phase of the delay’s feedback. Then we have the Delay 1 and 2 buttons, which let you pick which delay line you want to edit and alter (the display will change to whichever one you select). Finally, we have the setup button, which allows you to go into the pedal’s menu and fine-tune and change options and parameters.
Finally, on the very top left, we have the LED screen, which shows you the settings for the buttons below it. You can use the left and right arrows to switch between displays. It will also show the settings and changes you make as you dive into the menus and settings.
Back Panel Inputs and Outputs
This pedal has a lot of jacks on the back, but it is fairly simple to understand. Starting from the far left, you have the two inputs, Left/Mono and Right. Connect both to run stereo in, or just connect the left to run the input in mono. Next, you have the outputs, again, Left/Mono and Right. Same as with the inputs, connect only the left if you want to run the pedal in mono. The last two are the Ctrl 2 or expression pedal input and the Ctrl 4 & 5 and GA-FC input.
These are for adding extra pedals and controls to manage more parameters of the pedal. Finally, you have the DC input jack to power the pedal on. The pedal runs on your standard Boss power supply and has a draw of 450mA, so you will need a fairly robust power supply to run it. You also have a ground terminal on the back to connect to earth if needed.
The final inputs and outputs are on the side. We have a mini jack for MIDI in and MIDI out. We also have a USB Type-C jack that allows you to update the pedal. The pedal comes in a cardboard box with a setup guide and a power supply. It also comes with four rubber feet you can attach so it doesn’t slide around on the floor (if you don’t plan to mount it to a pedalboard).
The Sounds
So let’s hear it! For this demo, we faced a challenge: there are so many sounds, features, and options that we couldn’t possibly cover them all! So in the demo song, I put together a quick track to showcase what you can achieve. Side note, the delay and flanger effects are done with the SDE 3000D.
After that, we go through some of my favourite example sounds, demonstrating what you can achieve with this pedal. We demo in both mono and stereo! As far as features go, we run through a few options; however, we are putting together another article where we show you some cool tricks you can do. If you want to find and hear a specific sound, check out the YouTube description for timestamps!
What are my thoughts?
My initial thought when I opened the box was that the Boss SDE 3000D was smaller than I expected! When I was waiting for the unit to arrive, I was worried it wouldn’t fit onto my modest pedalboard. However, it is a lot smaller and more compact than I thought! Yet, it never feels cramped or squashed. The foot switches are laid out nicely and have a good amount of space between them, but still remain close enough for you to press two to switch patches. Being Boss, it is built like a tank with a metal casing and rugged design! Not that we would expect anything less from Boss!
It is worth noting that the Boss SDE 3000D can do a lot! A massive amount, and because of this, there is a massive learning curve. However, sit with the walkthrough guide and mess around for an hour or so, and it will all start to make sense. After a few days, you will understand it, and from there it’s just time and getting hours of use in! It’s so simple to set up basic delays! Want a simple 1/4 note delay? Easy! However, want it in stereo with the delay line split left and right with modulation and tap tempo sync across all your delay lines? Well, then you will have to do a bit of menu diving!
Boss SDE 3000D Continued
What about sounds? Well, this pedal is glorious! The sounds you can get out of it are just amazing! Running it into two amps on full stereo is just stunning (we will talk about stereo shortly)! The four delay lines really allow you to get creative and wild with your delays, anything from a nice quick slapback to a full-blown atmospheric delay. Using the built-in EQ options, you can adjust the repeats to give you more of an analog delay and make the delay get darker, or keep it nice and crisp! Being that it is now 32-bit, the processing is fast and responsive, and the audio is crystal clear and vibrant. Are after those Crystal clean delays? This the perfect pedal, but just don’t be fooled! That isn’t all it can do, mess with the EQ and you will be able to get some lovely modulated and analog delays!
What I love about this pedal is that they really thought of everything! Within the settings, there aren’t just things to make your delays sound different but all the control you would want! After the tap tempo to only affect one delay line? Want to copy one delay sound to another preset? Want to control the pedal with MIDI? External foot switch? You can do all of this and more! This is a proper piece of professional kit, all with incredible ease of use! It is very quick to make the minor changes you might want on a delay pedal!
"How often will you be playing in stereo? I’m not talking about stereo from your amps; I’m talking about what your audience hears."
Complaints?
I do have a few complaints. The first one, well, is not really a complaint but something to consider. How often will you be playing in stereo? I’m not talking about stereo from your amps; I’m talking about what your audience hears. Most front-of-house (FOH) setups will be summed to mono, so your delay will be converted to mono. As a recording tool, this thing is incredible—tempo sync, MIDI, and programmable! It makes it a killer option for recording. This doesn’t mean you can’t use it live; it’s insane what this pedal can do, but unless you are running stereo front-of-house, it will most likely end up in mono.
The second issue is that I wish it only reset your settings when you shut the device down. If you have a patch and you make a change and then swap to another patch, when you swap back to the previous patch, your changes will have reverted to the “default patch.” I guess this is the correct way to do it, but it can be annoying if you forget to save. I would prefer it if it reset the patch on startup and not on patch change.
"If you are a fairly basic delay user, meaning you only use one setting and nothing else, then this will be overkill."
Final Thoughts?
My last talking point is the price. I picked my unit up on sale for £299, which I thought was fairly expensive (and it is). However, after playing the pedal for a few weeks, I must say it isn’t that bad of a price (if you can get it on sale). Unless you desperately need the 3 outputs, I wouldn’t worry about going for the EVH version; it’s just more money for different outputs and a few presets. If you set it up so you have two separate delays on each line, then you effectively have two delay pedals being controlled with the same tap tempo. Pair this with the ease of use to swap presets, and it makes for a very powerful effect to have on your board!
However, on the flip side, I will be honest: if you are a fairly basic delay user, meaning you only use one setting and nothing else, then this will be overkill. You could get away with a simple Boss delay! However, if you find yourself wanting more options and sounds, then this is perfect!
Conclusion
So that is our review of the Boss SDE 3000D delay pedal. Would I recommend it? Absolutely, 100%! I think this is a killer pedal, and once you get to grips with the basic controls, it is really easy to set up. However, you can get more in-depth and dive deeper into it if you want! This delay pedal could be the only one you will ever need!
If you want to support the site then please give us a follow on Instagram and subscribe to our YouTube.
Boss SDE 3000D Links:
- Website
- Buy the Boss SDE 3000D (Thomann Affiliate Link)
- Buy the Boss SDE 3000D (Andertons Affiliate Link)
Check out our other Articles here
4 thoughts on “Boss SDE 3000 Delay Review – 80’s Delay makes a return! ”
Comments are closed.